001-1000: Vital Points - Background & Common Points
What are the vital points?
One of the key sources of knowledge we use while analyzing the techniques that make up martial arts is an ancient book called The Bubishi. This is often called the "martial arts bible", and formed part of the basis that goju-ryu karate was built upon.
The Bubishi speaks about points on the body in a similar way as an acupuncturist would - there are sections of the body that contain pockets of qi energy (a theorised vital force holding together each living entity) In our context, our goal is to disrupt this force to damage our opponent.
Vital point strikes were treated as effective due to their disruption of this qi energy in The Bubishi’s day. From a more modern and practical standpoint, each point has its effectiveness for a variety of different reasons - most commonly either a nerve cluster (e.g: under the armpit), a point where an internal organ is close to the skin (e.g: kidneys), or somewhere easy to disrupt the flow of blood through an artery (e.g: outer larynx.)
Common Points
The Bubishi speaks to 36 vital points all around the body and, while all are effective, I have narrowed 11 that are the most common and effective within Goju.
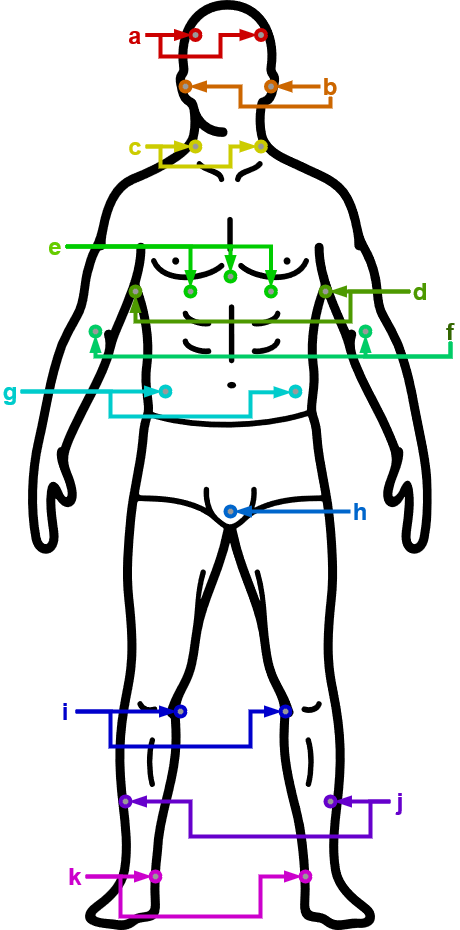
A diagram of the body marked up with 11 points from a to k.
Point a - Either side of the temple

When struck precisely, this point can rattle the skull and disrupt your opponent in a non-lethal manner. Strikes with power to this point should be done with extreme caution, and I would consider this a restricted point.
Point b - Either ear

With a cupped open-handed strike, forcing air into the ear will disrupt your opponent’s vestibular system - the organ used for balance. Additionally, it can cause quite a loud noise for them which (in itself) is disorientating.
Point c - Larynx

The larynx is a key part of our breathing system, and strikes here disrupt the airways for a period of time and can cause a choking-like effect. This point should be treated with care as a restricted point.
Point d - Axillary area (under armpit)

Given it is usually protected when your arms are down, the body evolved with a very large nerve cluster quite close to the skin and a collection of tendons. Strikes here are unlikely to do much damage, unless performed with extreme force and the intention to dislocate the arm, however will cause your opponent pain.
Personally, this is one of my favourite points.
Point e - Xiphoid process & diaphragm

In a similar fashion to the larynx, the diaphragm is vital to our airways. If timed right, a strike here can wind your opponent. If done with force, a strike here can dislodge the xiphoid process and cause it to damage the internal organs/ribs. This point is not a restricted point, but should be treated with care.
Point f - Antecubital fossa (inner elbow)

In a similar fashion to the axillary area, this area is usually protected when relaxed. The tendons & nerves here are exposed frequently, and a strike here causes pain and disruption.
Point g - Kidneys

The kidney often rests quite close to the skin, and (given they’re an internal organ) are not designed to sustain force. A strike here will cause some damage.
Point h - Groin

Not much more to be said here. In any anatomical configuration, nerves are quite dense here and a forceful rising strike here will pass that energy through the hips to disrupt the center of balance.
Point i - Popliteal fossa (rear of knee)

While this area is usually exposed when resting, strikes transfer energy through the hinged portion of the knee which will disrupt balance.
Point j - Outer shin

Striking perpendicularly here can cause the muscle to separate from the shin, causing lasting damage.
Point k - Heel (rear)

When directed here, if the opponent's balance is incorrectly positioned a sweep will be very effective in getting your opponent to the floor.